Tuesday, 15 October 2019
Analysis of my first continuity sequence for Sean
At the start of our editing process, one thing we should have added was a fade in to our first scene. This would have made our project look presented.
Shot 1
- Establishing shot
The first shot is an establishing long shot of the scene to show the audience the location at this time. With the subject walking past the camera, it goes from a close up to a medium long shot. It then cuts to a match on action editing point.
Shot 2
- Wide long shot
From the camera being inside and Declan heading for the doors, we cut it to the camera outside as a wide long shot, angled straight ahead and panned around, following Declan's walk.We made sure that the subject was always in the middle of the screen so we never go to fast or to slow when panning. At the end of this shot he reaches out his arm where another match on action is edited.
Shot 3
- Medium close up
The match on action on is cut from his arm reaching out to the car door. This is shot at eye level and an extreme long shot. It cuts to a medium close up of his hand reaching out for the car door and opening it. The match on action fits well and are matched perfectly so there is no continuity. As he goes in and sits down on the chair we cut it to another match on action shot.
Shot 4
- Medium long shot
This match on action is different because we broke a rule in the continuity system with the 180 degree rule. So we moved the camera around to the other side of the car to get the match on action shot. as he goes to sit down in the car it matches his action and flips to the other side for the rest of him sitting down. This is shot at a medium long shot of the inside of the car.
Shot 5
- Long shot
We tried to film and edit and jump cut from him in his car and him on the chair but it didn't go as planned. There is a lot of continuity in this shot. First of all we did another match on action from him mid way sitting down, cuts to him jumping on the chair. One continuity we found was we weren't smart filming this and we needed to think more in detail about the positions Declan were in. It suddenly cuts from him getting into the car, his hands are down and not on the wheel to him in the chair with his hands up and hold the wheel that actually isn't there. This shot is a long shot and in the same position as shot two just closer and to the left. It then cuts to the other shot, linked with a match on action.
It straight cuts to a different camera angle. It moves 90 degrees anticlockwise but stays are the same level. The shot is a medium long shot. The match on action is perfect as his body stays in the same place and moves the same way in the chair. It then cuts to another match on action to a close up of his face.
Wednesday, 9 October 2019
The continuity system of editing
The continuity system of editing
The continuity system of editing is the system in which is involved to where continuity occurs. There are 5 main rules to do to make sure continuity doesn’t occur in your shots.
180 Degree rule (+ axis of action)
180 Degree rule is the line in which when editing you must not cross. The cameras must stay one side of the subject otherwise the image will flip and make it look like the subject has moved places or facing the other way.
Shot/Reverse shot
Shot/reverse shot is where two cameras are angled to the same focus point. If two people where facing each other, one camera would be angled behind person A, facing person B. And the second camera would be behind person B, facing person A.
Establishing shot
An establishing shot is where the camera shows everything in that scene. They are usually still. These give the audience an idea of what the scene looks like, or where everything is. If it were to just jump to different close ups, the audience wouldn’t know where everything was placed. So, these are used to make the scene clear.
Eyeline match cut (POV)
The eyeline match cut I where a camera in pointing at the subject looking at something. It will then jump cut to the subject they are looking at.
Match on action
Match on action is where you edit it, so it cuts from one shot to another view that matches the first shots action. If a hand were to move and grab something of a table, the first shot would be of the hand moving towards the table and then it would cut to the hand coming down and grabbing the objects sitting on the table.
Monday, 7 October 2019
My first premiere pro editing exercise
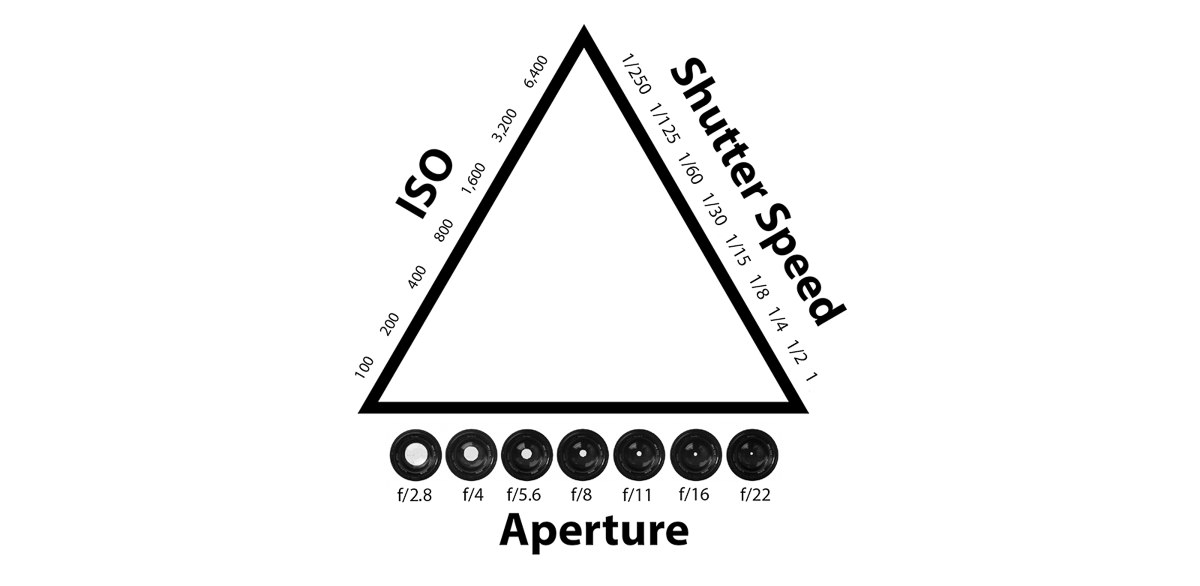
First of all, we learnt the basics around a camera. Always have the camera set to manual so it doesn't control it for you. We learnt how to fix the aperture, ISO, and shutter speed to correct it to the right exposure. The shutter speed always has to be on the lowest so 3.5, if i am zoomed in it would be bigger. The bigger the aperture the more exposure. We learnt the way around the correct settings in the menu, there are so many i cant remember what each one was set to unfortunately. The ISO tends to be low so 100-200, this will be less grainy and darker. With the aperture i know that the larger the aperture (Which is the smaller number f/1.4), the more light is let it. The smaller (which is the bigger number f/22), the smaller the hole is and the less light shines through. To know we had the right exposure we had to look at the little line with and arrow at the bottom of the screen. The arrow would move up and down depending on your exposure and if it was in the middle on O, you'd know whether it is exposed correctly. We learnt how to focus correctly, using the white square and pressing on the main subject in the camera and then slightly pressing the button to get it focused. We learnt how to create a shallow depth of field, focusing on a close up image with a further back image behind it, blurry. I put the white square on the object in front and focused on it to create the blurriness of the object behind it.
We learnt to import our footage onto the mac computers, ready to start editing. Having to make all different folders in premiere pro and the documents. This helps us stay organised and focused on where our footage is so we never waist time trying to find it. In premiere pro we made three folders, one for footage, one fore audio, one for graphics. On the documents, we made one big folder with our names and what the task we are doing. Inside of that folder we place another footage and audio folder so its not all over the place. We then imported our footage to the correct folders in our documents. We double tapped in the footage folder in premiere pro and selected all our footage so it appears in the folder.
We were given the exercise to create a rough editing piece, adding in all the different skills and tools to make it effective. Starting of with just simply cutting the moving image to the length by pressing the I key for the input and then pressing the O key for the output, and then how to drag it down to the editing timeline. Once we had our baseline of all the footage we wanted put together, we learned how to create a fade in at the start. We select all the footage and move it forward to create a black space at the beginning. We then grabbed the pen tool and click at two different points, at the start and end of the first footage and drag down the first dot to the bottom to create the fade in. if we wanted to create a fade out it would be the same just pull the last dot down instead of the first. We also learnt how to add in a cross dissolve along with loads of other transitions. If to right click in the middle of two clips, press default transitions it will automatically put in a cross dissolve for you that you can move as long or as short as you want it. We deleted all the ambient sounds and replaced them with the music we downloaded of a free music sight.
Subscribe to:
Comments (Atom)
Analysis of my first continuity sequence for Sean
At the start of our editing process, one thing we should have added was a fade in to our first scene. This would have made our project loo...

-
Induction - 2 Boys 1 Can Evaluation: Overall, I think our short film was good. During the making of this short film we focused on the shot...
